
Selection and Highlighting
Foldnano has three independent selection systems, one per editing surface. Knowing which one is active explains why a selection in one view doesn't carry into another:
| Where | Selects | Granularity |
|---|---|---|
| Strand viewer | Strand ends (expanded to segments/oligos by filters) | End-based |
| Lattice plane view | Virtual-helix circles (in constrained-move groups) | VH-based |
| Freeform plane view | Virtual helices | VH-based |
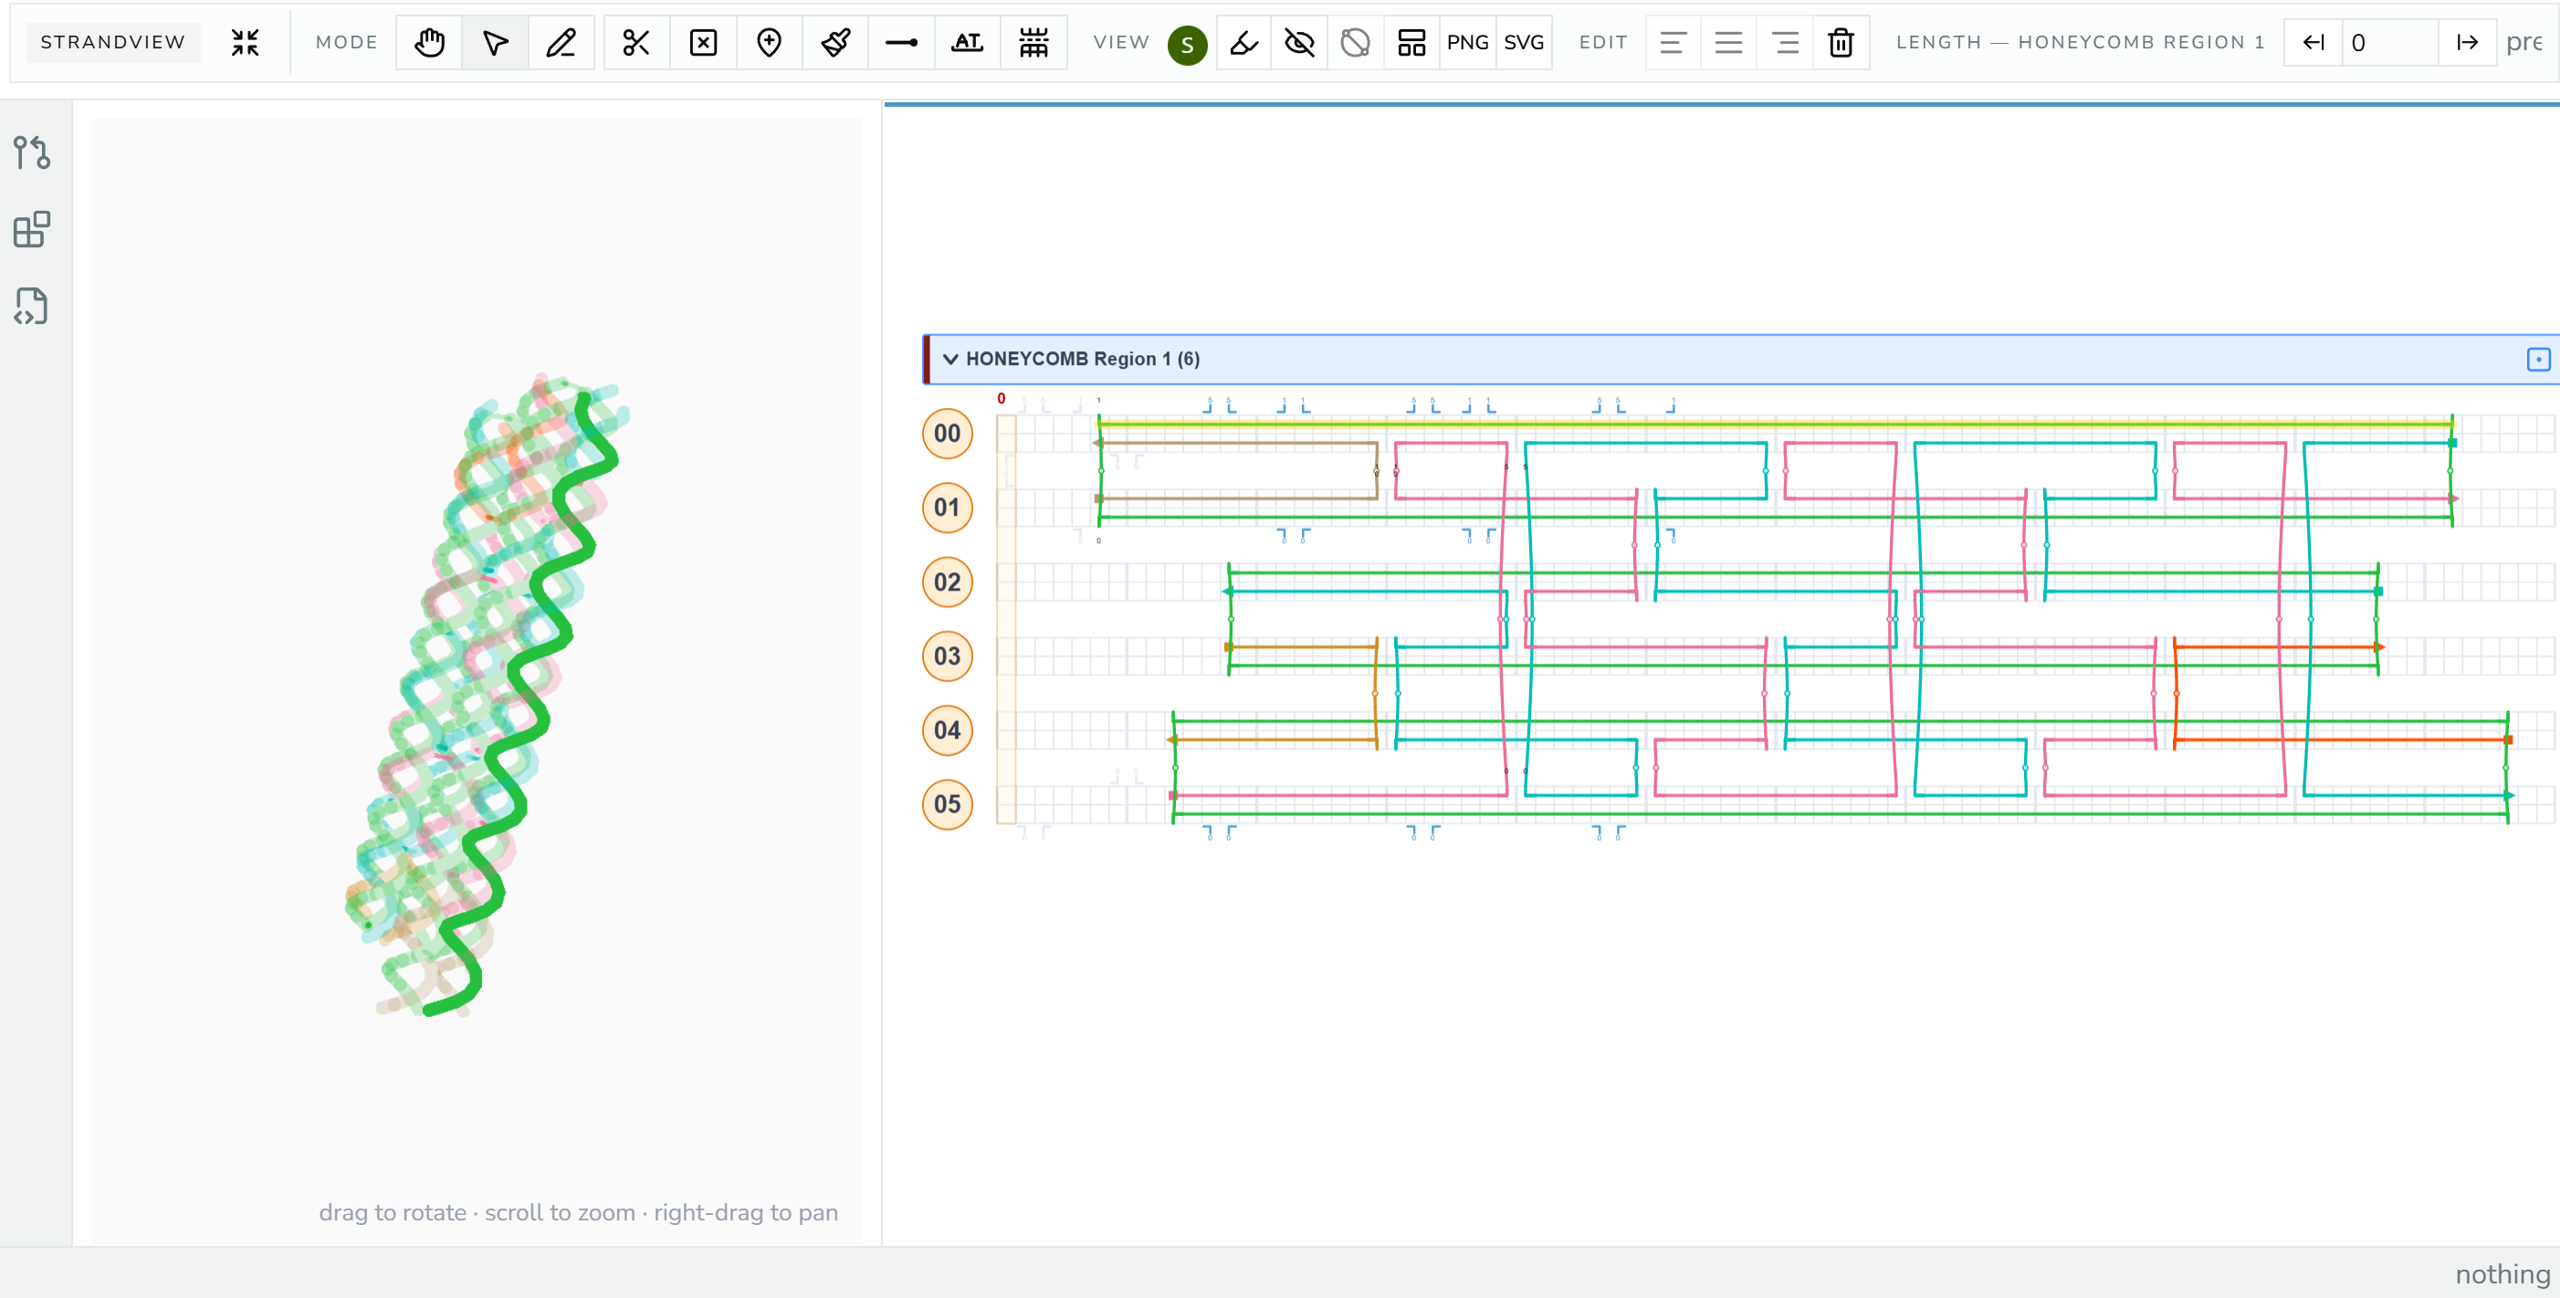
Strand viewer with an active end-based selection.
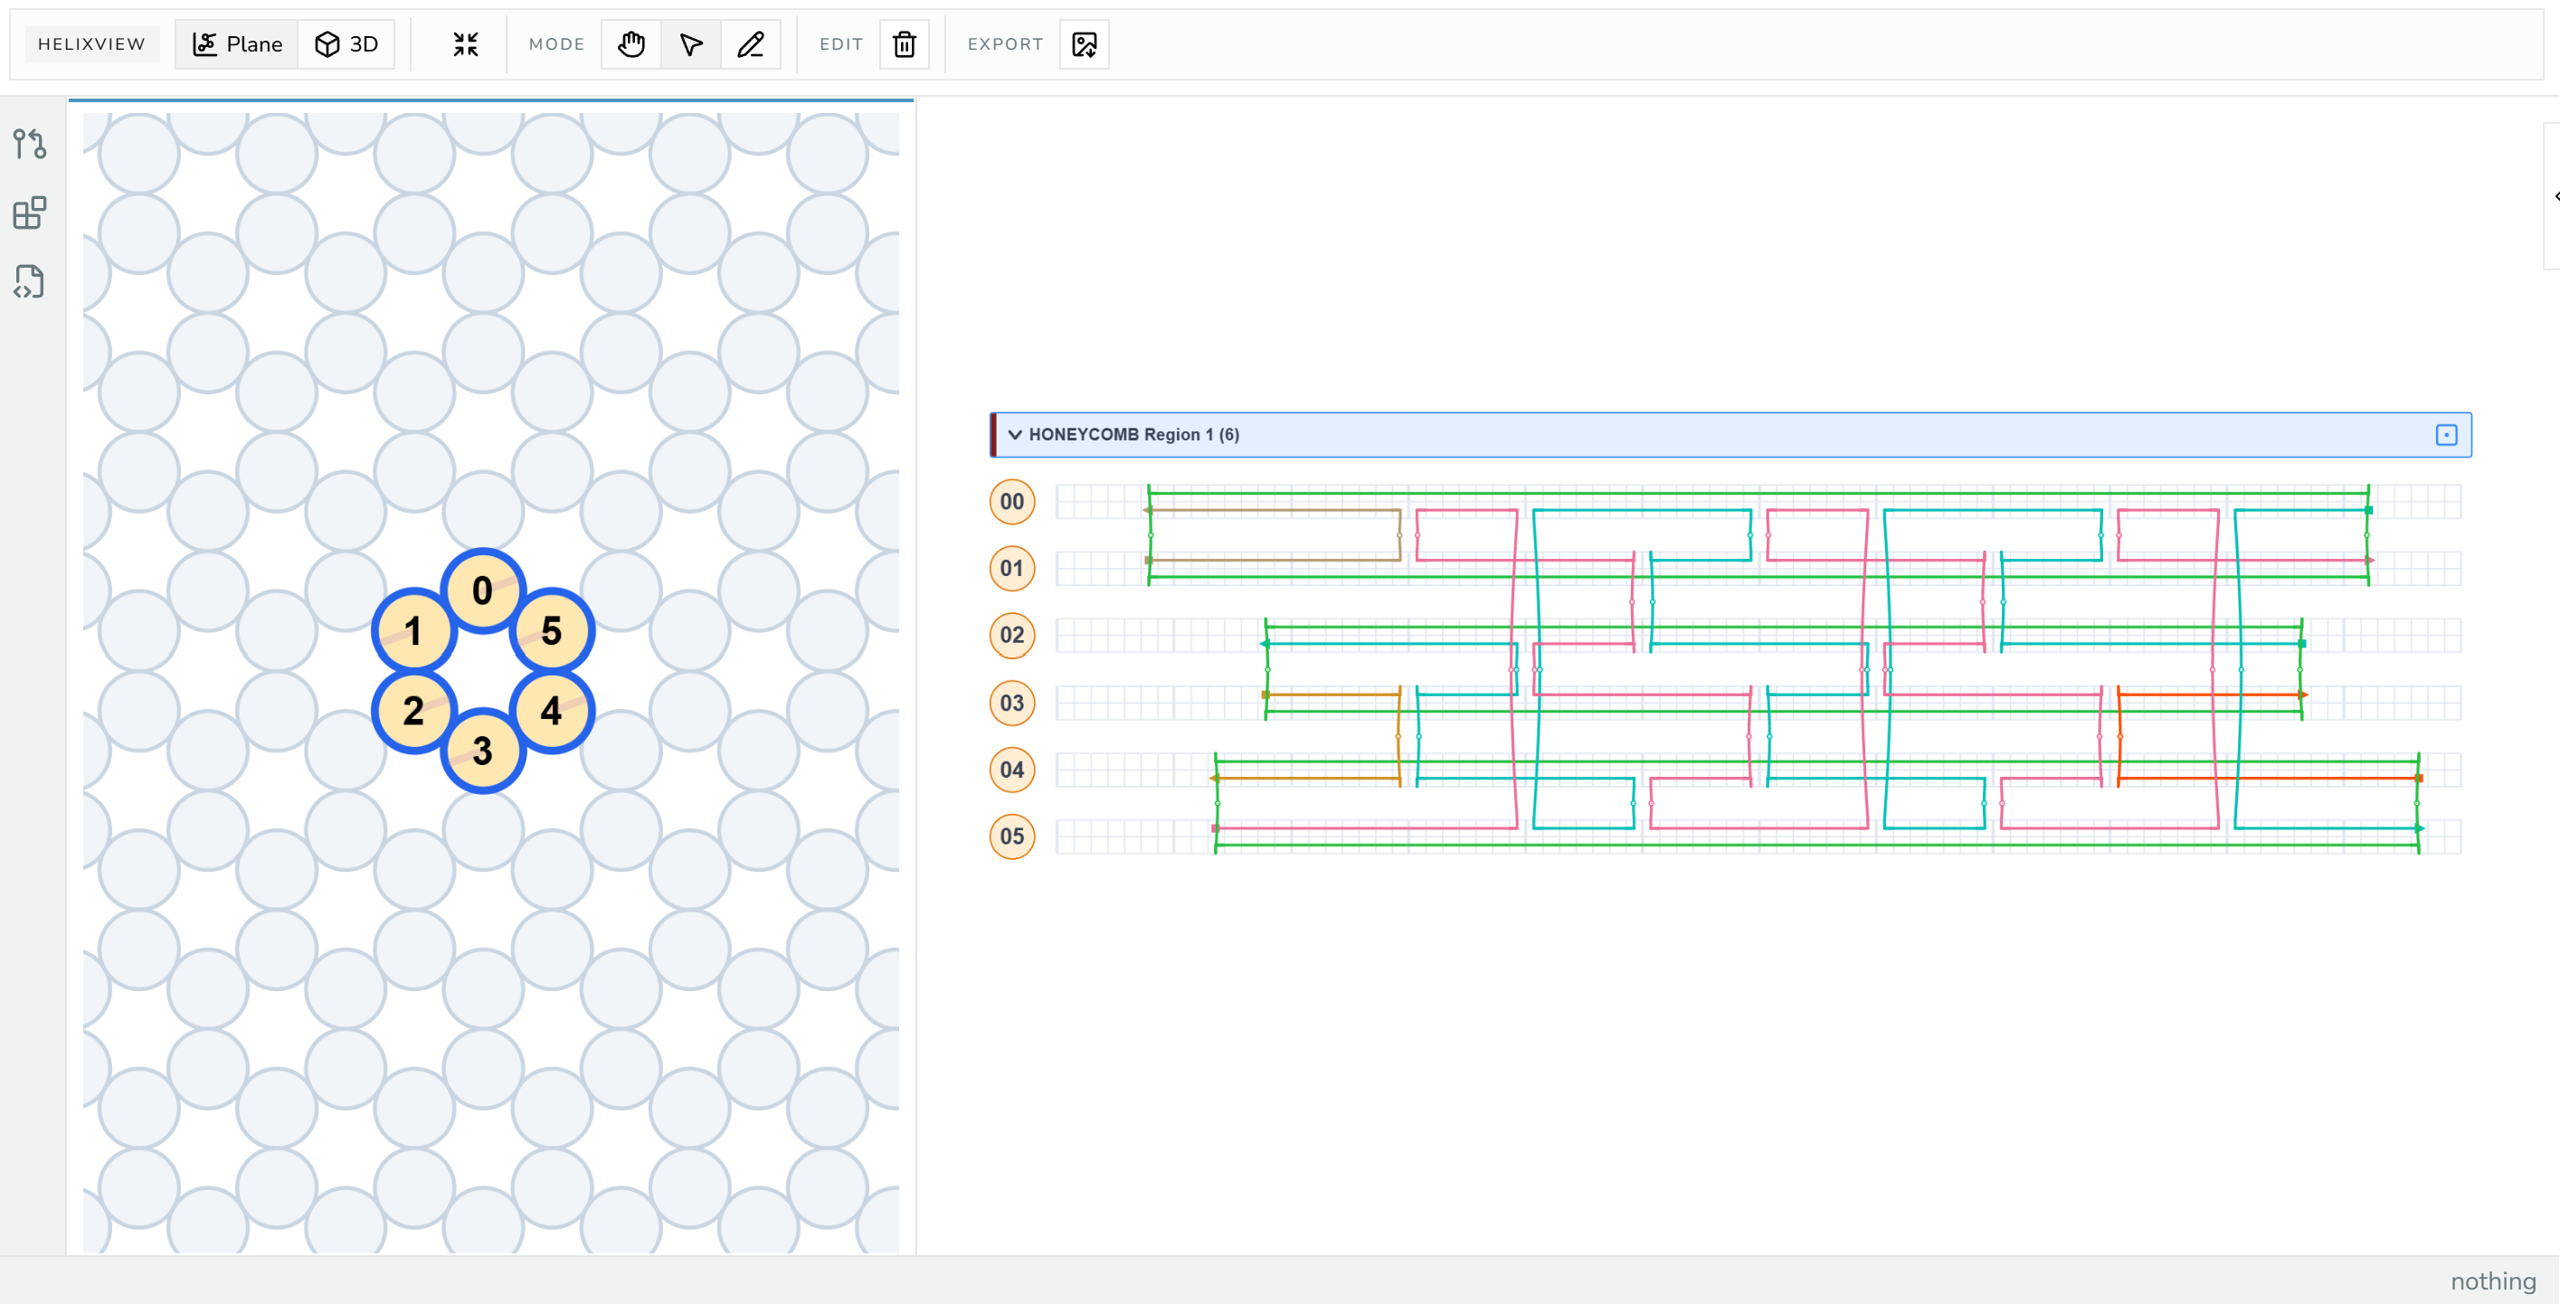
Lattice plane view with an active virtual-helix selection.
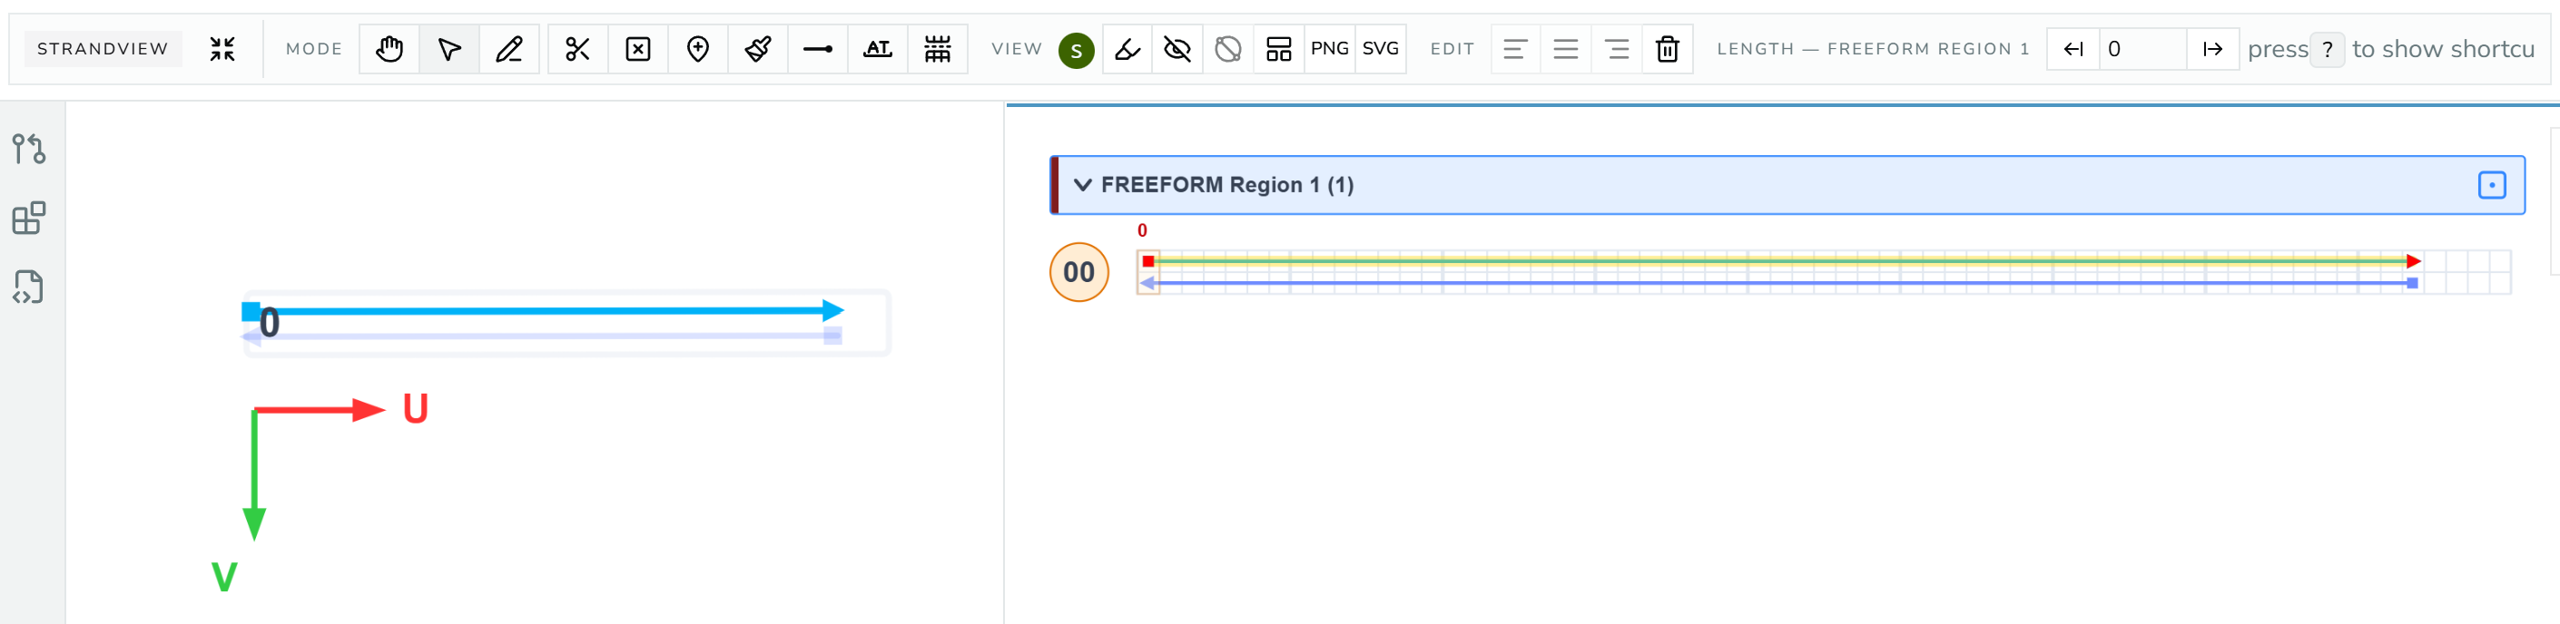
Freeform plane view with an active virtual-helix selection.
Strand-View Selection
The strand viewer uses end-based selection: the underlying unit is a strand end, and clicks expand outward from there.
| Action | Result |
|---|---|
| Click an end | select that end |
| Click a segment | select both of its ends |
| Click an oligo | select all ends in that oligo |
| Drag on empty background | marquee selection |
| Shift / Cmd / Ctrl-click | additive or toggle selection |
Delete / Backspace | remove the selected routing |
Escape | clear selection |
Selection filters
The Select tool panel's filters control whether a click expands to neighboring objects. Filters cover:
- SCAF / STAP (
c/t): limit selection by strand class - ends (
e), crossovers (x), segments (d), oligos (o): which object types are eligible; with oligos on, a click selects the whole oligo
The filter keys work while the strand viewer is the active viewer. Set the filters before clicking to control how far a selection grows. For example, enable only "scaffold" to marquee-select scaffold routing while leaving staples untouched.
Note
Region headers, VH tags, VH grid cells, and the cross-section cursor stay interactive in Select mode even when strand filters are narrow. Narrowing filters never locks you out of the region controls.
Select all with
The Select: dropdown in the panel turns a click into a "select all similar" action:
| Option | A click selects | Needs filter |
|---|---|---|
| Where I click | Just what you click (default) | |
| Same Color | Every oligo with the clicked oligo's color | oligos |
| Same Length | Every oligo with the clicked oligo's length | oligos |
| Same Modification | Every end carrying the clicked end's modification | ends |
Oligo info
Below the filters, the panel shows details for the oligo or segment you last clicked: its name, its 5′ → 3′ span (helix[base] -> helix[base], or (circular)), length, color, whether it's the scaffold, whether its sequence is locked, and its modifications. For a clicked segment, the panel also shows the oligo it belongs to.
Naming an oligo
The Name field (gray background) is editable. Type a name and press Enter or click away to apply it; Escape cancels. Each rename is a single undo step, and clearing the field removes the name.
Names are optional labels for your own use and for downstream tools: they appear in the oligo report and as the Name column of the sequence CSV. Most oligos have none. Foldnano doesn't check them: two oligos can share a name, and nothing in the editor depends on it. Breaking a named oligo gives every piece the same name, and joining two oligos keeps the name of the one whose 3′ end makes the connection.
Mirror oligos in a repeat group show their source's name read-only; rename the source instead.
The Select panel also hosts the Repeat groups list when the design has linked copies; see Duplicates And Repeat Groups.
To see how the target filters change what a click selects, try the Select and filter targets step of the interactive walkthrough on Editing Tools.
Moving selected ends
Drag a strand-view selection left or right to move the selected ends together by a single uniform shift, which preserves their relative spacing. If the exact drop position is blocked, the batch snaps to the nearest valid shift; if no valid shift exists for the whole selection, the drag makes no change.
Constrained crossover ends move too. Each one snaps to a valid crossover site on the same partner helix, and its partner end moves along with it so the crossover stays intact, even when that partner isn't part of the selection.
To copy selected oligos elsewhere, see Duplicates And Repeat Groups.
Dragging one end (expanding/shrinking a strand) and dragging both ends together (sliding the whole strand) treat sequence differently:
| What happens to assigned sequence | |
|---|---|
| One end | Positions outside the new range are dropped. Newly added positions are auto-filled from the complementary strand's existing sequence; this is safe to do silently, since those positions were previously blank. |
| Both ends together | The strand keeps its own sequence exactly as-is; the complementary strand is left untouched. Since the partner doesn't necessarily move too, this can leave the two sides mismatched at some positions. |
Note
For a whole-strand slide, Foldnano doesn't guess which side to fix when a mismatch results: that would mean silently discarding one of two sequences you deliberately assigned. Instead it flags the mismatch (see sequence mismatch under Highlighting And Hiding below) and leaves the choice of which strand to edit to you.
Aligning ends
The strand-view toolbar's Edit group has three buttons that line up ragged ends in one step, instead of dragging each end by hand:
| Button | Effect |
|---|---|
| Align free ends left | Moves the selected ends to the leftmost of them |
| Justify selected segment ends | Moves selected left ends to the leftmost of them and selected right ends to the rightmost of them |
| Align free ends right | Moves the selected ends to the rightmost of them |
For example, three staples on neighboring helices end at bases 40, 42, and 45. Select those three ends and click Align free ends left: all three move to base 40, so the staples become flush. Align free ends right would move them to 45 instead.
Which ends move:
- Only free ends. An end joined to a crossover or connection never moves, even if it's selected.
- One end of a segment selected: that end moves.
- Both ends of a segment selected: Align left moves the segment's left end and Align right its right end, so the segment stretches or shrinks rather than slides. Justify moves both.
When the buttons are available:
- Only in the Select tool, in a tab that owns the document.
- Align left / Align right need at least two ends that would move.
- Justify needs at least two segments, with at least one selected left end and one selected right end.
- The move is all or nothing. The button stays disabled if any end would overlap another strand (including another moving one), reverse its segment's 5′ → 3′ direction, or run past the end of the helix.
The whole alignment is one undo step. Sequence on the moved ends follows the single-end rules in the table above: bases outside the new range are dropped, and new positions are filled from the complementary strand where it has sequence.
Lattice Helix Selection
Lattice plane view has its own VH-based selection, separate from both strand-end and freeform selection.
- Click selects one constrained-move group (helices that must move together).
- Shift / Cmd / Ctrl-click toggles one constrained-move group.
- Marquee selects all intersected helix circles, then expands each to its full constrained group.
- Drag a selected helix moves the whole selected set together, only if every target cell is valid.
Delete/Backspace(or the Delete toolbar button) removes the selected helices, but only empty ones; helices that still carry strands are skipped to prevent accidental data loss.- Undo / redo restores lattice helix positions after a move or a delete.
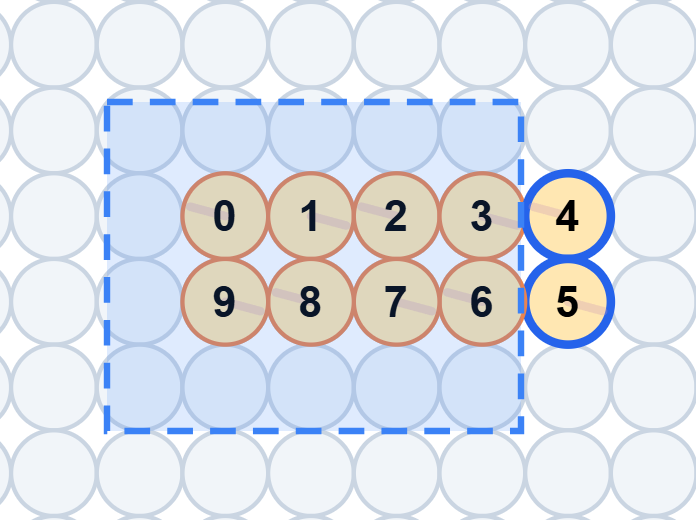
Lattice plane with one constrained-move group already selected (blue ring) and a marquee rectangle actively in progress over several other circles.
Freeform Selection
Freeform plane view selects whole helices, the same way the lattice plane view does:
- Click or marquee-select VHs.
- Drag to move selected VHs.
Delete/Backspaceremoves selected freeform VHs.
Clicking a freeform helix's number tag at the left of the strand viewer selects it too (Shift-click adds or removes it), so you can turn a helix from the strand viewer while the 3D view is open in the other pane. With freeform helices selected, the Selection Tool panel shows their Roll, position and direction:
- Roll is how far the helix is turned about its own axis, which sets where its backbones and crossovers face. The dial shows the helix end-on, seen from its first base (bp 0); drag the dot (it snaps to 15°, hold
Altto turn freely) or type an angle. Clockwise is positive. 0° points along the plane normal (W) for a helix lying in the plane, or along U for a helix standing up. - U, V, W give the start of one helix in nm, measured along the region plane's own axes: U (red) and V (green) lie in the plane, W (blue) is its normal. The freeform plane view draws them at the plane origin (W points into the screen, shown as ⊗), and the 3D view draws them for the active freeform region. With several helices selected they become ΔU, ΔV, ΔW and move them all by that amount.
- Direction turns a helix that lies in the plane, keeping its roll.
When several helices disagree, the field is blank; typing a value applies it to all of them. On the canvas, a selected standing helix shows its roll as a small handle on its circle, and a helix lying in the plane shows a little end-on dial just before its start. Drag either to change the roll.
Both plane views are helix-based; strand-level routing and selection for a freeform region happen in the strand viewer, exactly like any other region.
Highlighting And Hiding
The strand-viewer toolbar includes highlight and hide menus. Highlights dim non-matching oligos while keeping matching ones emphasized, which is useful for auditing a dense design. Hiding removes visual clutter without changing the design.
Highlight types:
| Highlight | Emphasizes |
|---|---|
| scaffold | oligos marked as scaffold |
| circular strand | closed-loop oligos (these block CSV export, see Simulation And Export) |
| with modifications | oligos carrying a terminal modification |
| longer than 90 | oligos over 90 nt |
| shorter than 15 | oligos under 15 nt |
Tip
The length highlights are handy QC passes. "Shorter than 15" finds staples too short to be useful; "circular strand" finds loops you must linearize before some exports.
The same menu has a separate Warnings group below Highlight, for flagging defects rather than categorizing oligos:
| Warning | Flags | Default |
|---|---|---|
| sequence mismatch | Base pairs where both strands have an assigned letter but they aren't complementary, drawn as a short red line connecting the two strands at that position | on |
Sequence mismatch is the most common result of sliding a whole strand (see Moving selected ends above): the strand keeps its own sequence, its complementary partner doesn't necessarily move with it, and the two can end up out of sync. Turning the warning off only hides the markers: it doesn't fix anything, and mismatched bases still need to be corrected by hand.
Hide toggles: crossovers, unconstrained crossovers, sequence.
Hiding crossovers clears the lines but keeps the information: each crossover end shows a small arrow labeled with where it goes, such as 12[34] for helix 12, base 34. A target in a collapsed region also names the region, such as R2:12[34]. When you zoom far out, only the arrows remain.
Unconstrained crossovers applies this only to crossovers that aren't constrained, and keeps the lines of constrained crossovers. It affects the strand view only, while crossovers also hides them in 3D.
- Hover a label or its crossover end to show the line temporarily.
- Click a label to select the crossover. A selected crossover keeps its line until you deselect it, including every crossover of a selected oligo.
- Double-click a label to jump to the other end, expanding its region if it is collapsed.
The 3D view uses the same highlight context, so a highlight set in the strand viewer also dims the matching strands in 3D.
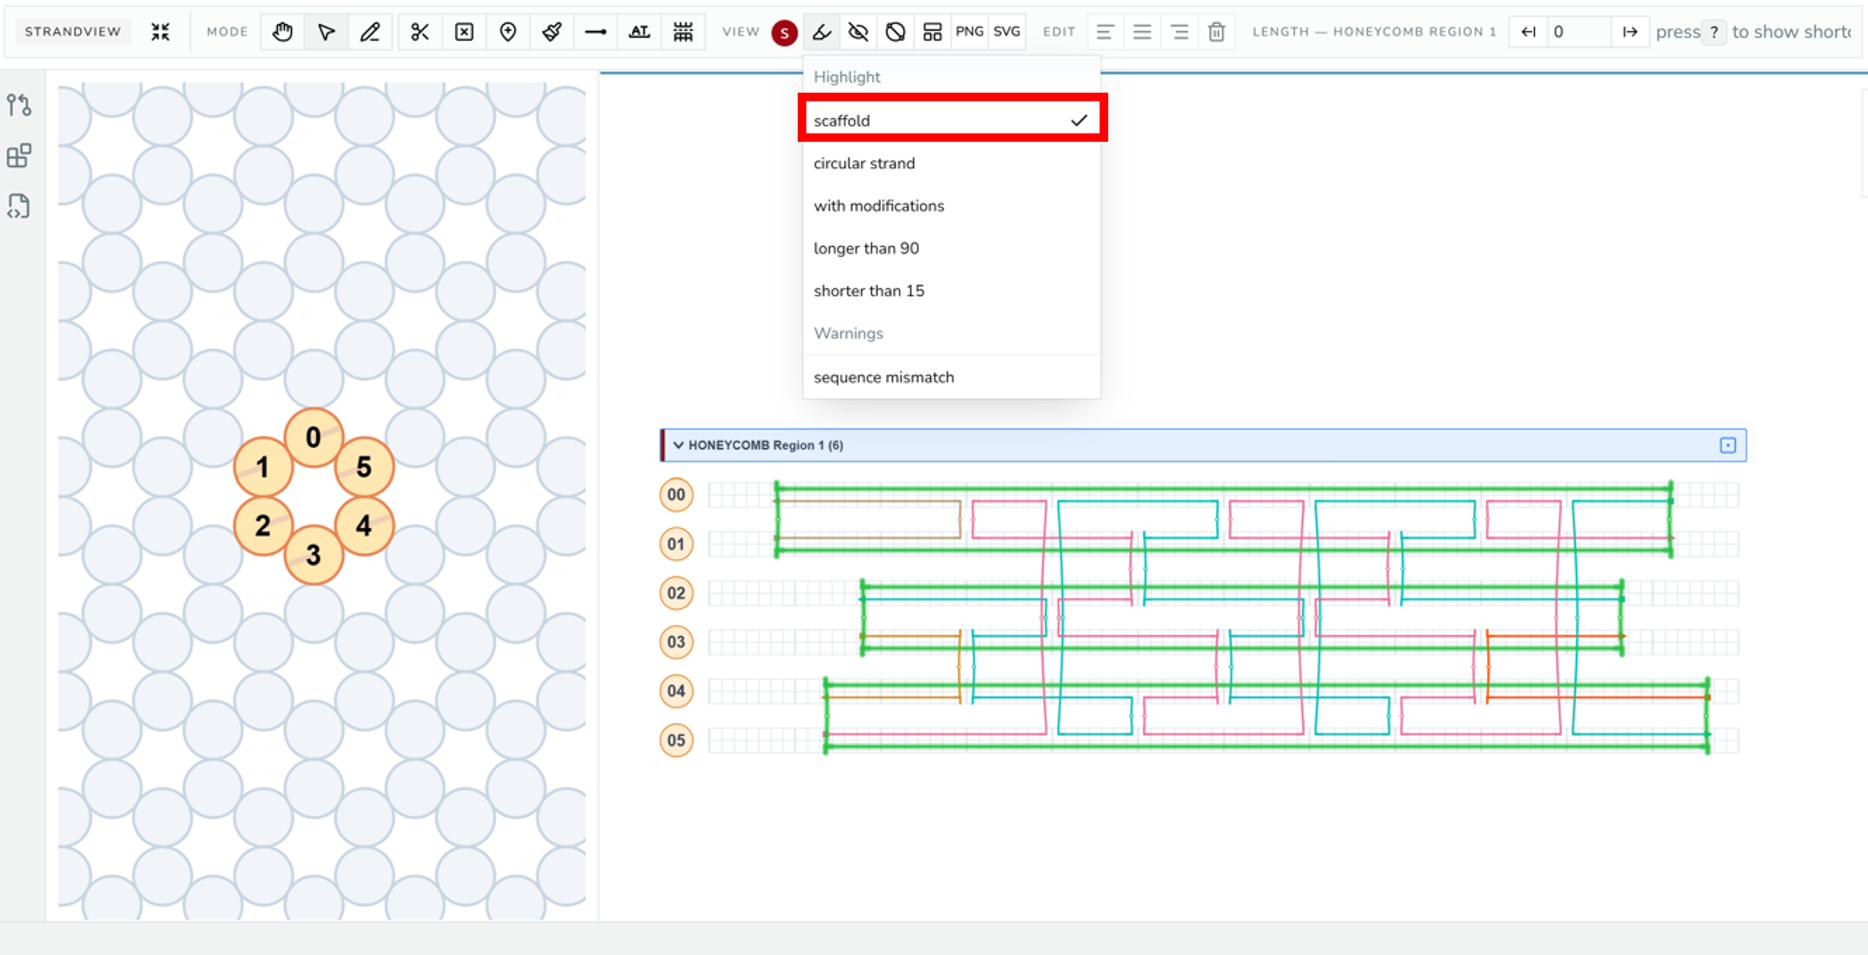
Strand viewer with the 'scaffold' highlight active, non-scaffold oligos dimmed, and the Highlight menu open with 'scaffold' checked.
Circular Scaffold Map
The Circular Scaffold Map is a QC view of how the staples bind the scaffold. Click Circular Scaffold Map in the strand-view toolbar's View group to open it in the tool panel; click it again to close. It's available once an oligo is marked as scaffold, and it shows one map per scaffold.
What it draws:
- The scaffold as a circle, labeled with its name and length, with its 5′ end (square) and 3′ end (triangle) marked. A linear scaffold is drawn as an open arc; a circular scaffold with a single nick is drawn as a circle with a small gap.
- Each staple as arcs inside the circle, one arc per stretch of scaffold it binds, joined by chords where the staple crosses to a distant part of the scaffold (at a staple crossover, or where the scaffold itself crosses over under a continuous staple segment).
- A radial bar per double-stranded segment outside the circle; its height is the segment's length.
- Two histograms below: segment length (nt) and crossover span, the sequence distance along the scaffold between the two ends of each chord. For circular scaffolds the span is measured the short way around.
Long chords and wide span histograms mean staples that tie together distant parts of the scaffold, which is usually what holds a structure together; many very short segments are worth a second look before ordering.
Working with the map:
- Hover a staple to emphasize it on the map; click it to select that oligo in the strand viewer. Selected staples stay emphasized on the map.
- Zoom with the zoom buttons or
Ctrl/Cmd+ scroll; scroll to pan. - Make circular draws a linear or nicked scaffold as a closed circle; click again to revert.
- Set a histogram's bin size to group lengths, or its max count shown to cap the y-axis so small bars stay visible.
- Download SVG saves the map; Copy histogram data copies the histogram values as tab-separated text for a spreadsheet.
See the Interface Reference for the full control list.
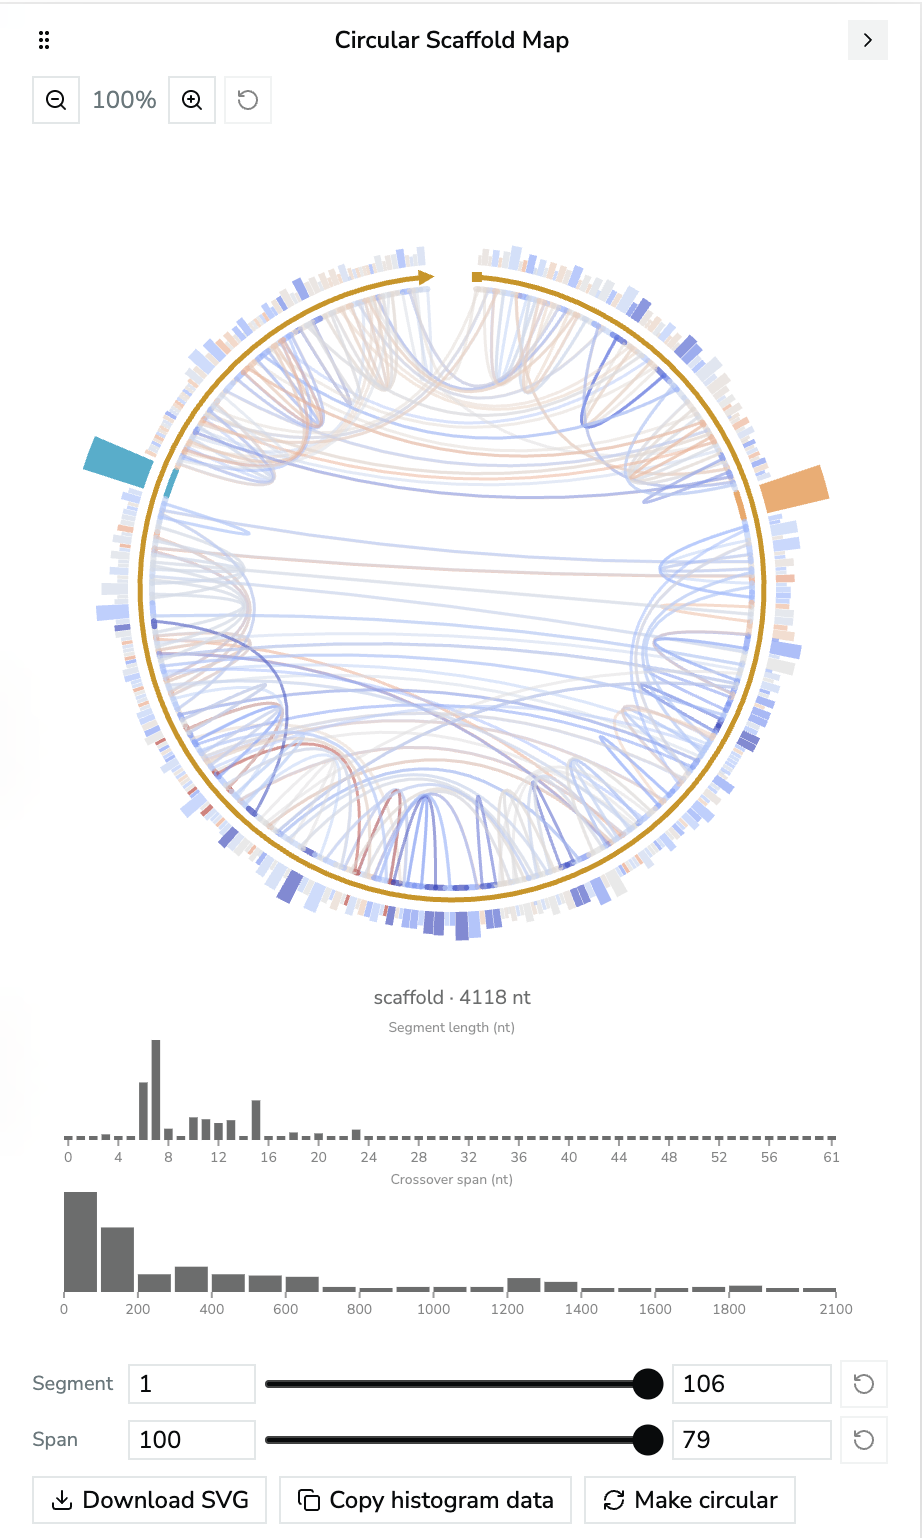
Circular Scaffold Map for a 4,118 nt scaffold, with one staple hovered and both histograms below.